Creativity can take many forms, from an artist drawing in a sketchbook, a musician composing a tune, or even a home chef attempting a new meal. But what happens when that ‘creative itch’ comes for a gamer? That’s what Scratch is for and you can easily learn how to make a game on Scratch!
Scratch is a block-based coding language that can be used to program all sorts of games. It was created by a team based out of MIT to encourage young coders to stretch their abilities and make something new.
There is a huge variety of Scratch games out there and each one has elements that make it unique. What they all have in common is the steps that were taken in order to transform them from a basic concept into a playable game. Understanding these basic steps is the key to learning game development in Scratch.
Recommended: 25 Best Scratch Games
At its core, the process for making a Scratch game can be broken down into 6 main steps:
- Write out the steps for your Scratch game
- Make a design for your Scratch game
- Add sprites for images or characters
- Add code to each sprite with blocks
- Add logic using code blocks
- Test your Scratch game and share it with friends!
By working through these steps, you will be able to make your very own game. From Scratch!
Step 1 – Write out the steps for your Scratch game
Before writing the steps to your game, it is important to decide what type of game you want to create. Will your game be a collecting game, a quiz game, or something else entirely?
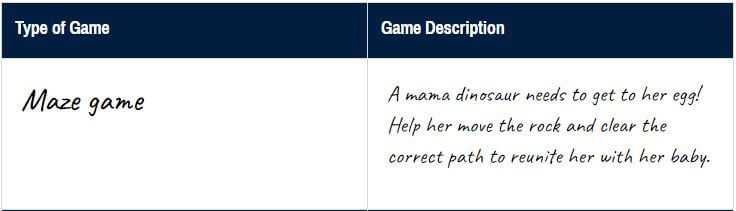
It is also important to plan out the objectives of your game. What is it that you want the player to do? A simple objective could be getting the player to collect an item to make their score go up. Another might be to avoid falling obstacles for as long as you can. As the game maker, you get to choose what the player needs to do to win the game!
Once you have decided on what type of game you want to build and the main objectives, you can start writing out the steps for your game. How will the player start the game, attempt to meet the objectives of the game, and ultimately end the game?
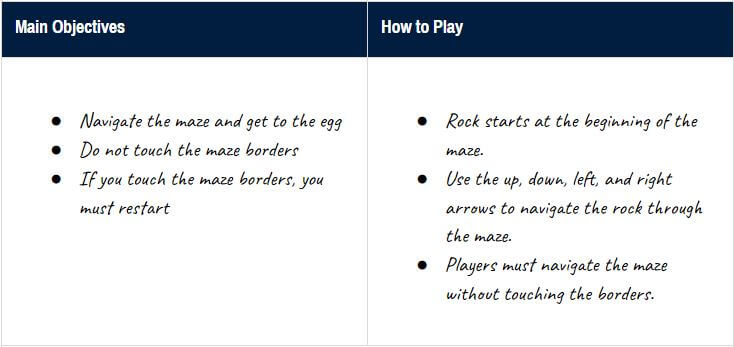
Planning out the goals for your game, the steps that are necessary to achieve those goals, and the pieces needed for each step are all important before you start building your game in Scratch.
Step 2 – Make a design for your Scratch game
Scratch games can often work well with a variety of themes, but the way your game looks has a huge impact on the overall feel of the game, so it’s important to decide the design of your game next. Scratch provides a large base of backgrounds that you can use to customize your game. You can also upload or draw your own images, add text, sounds, or whatever you need to make your game great.
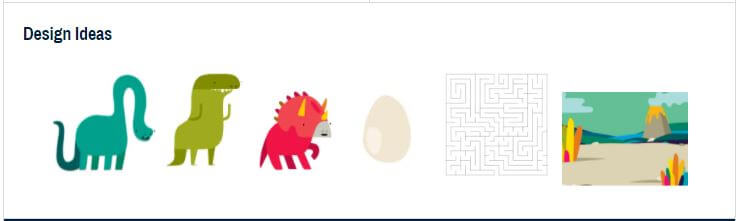
You can go as simple or as detailed as you like here. This is where you get to decide if your game has a high-tech sci-fi theme or a medieval knights and dragons one. Or anything in between! Go ahead and add your chosen backdrops into Scratch at this point. We’ll be adding our sprites soon.
Choose a theme and design scheme that gives the game the feel you’re looking for to maximize your fun!
Step 3 – Add sprites or characters
Sprites are the pieces of your Scratch game that get the most interaction. They are the images and objects that you will add code to. Sprites include the player’s character, any enemies, items, or neutral characters. Pick sprites that go well with your visual theme and add them into the game!
For example, in a collection game, you may have the player’s character, the items they are collecting, and an enemy that would cause the player to drop those items or end the game. Each of these “characters” needs a sprite associated with them, even if that sprite is just a coin or a piece of candy.
Anything that the player can interact with should be added as a sprite.
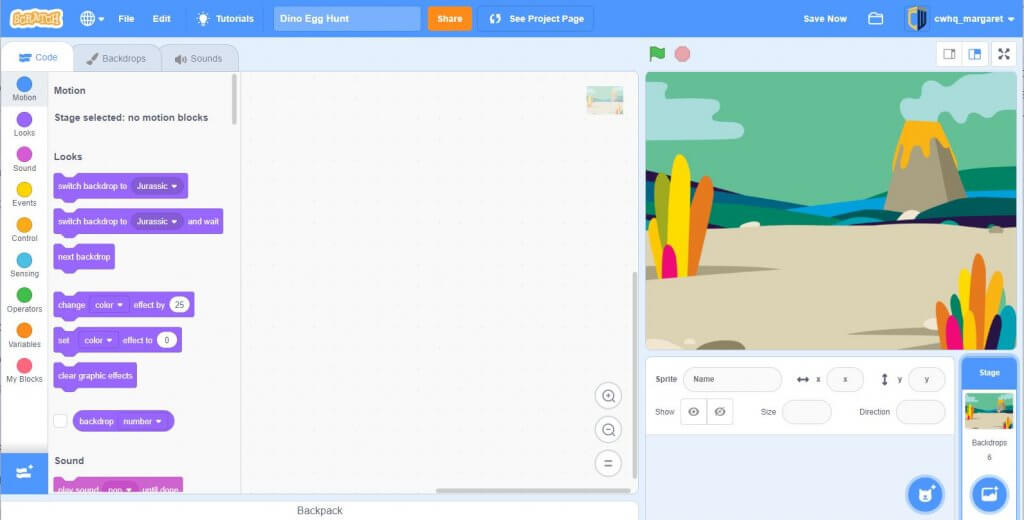
Step 4 – Add code to each sprite with blocks
Once you’ve decided how your game will work and set the stage with your backdrop and sprites, it’s time to add some code. Each sprite needs its own code to tell them how to act. Does your player move using the keyboard, the mouse, or either one? Does your enemy consistently move towards your player’s character, or do they move in a fixed pattern? Do the coins that the player is collecting move around the screen or are they static?
Make your decisions and then drag some Scratch blocks into the coding area to get things moving!
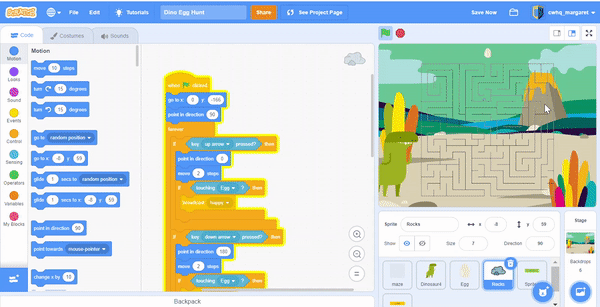
Step 5 – Add logic using code blocks
The game’s logic is what makes the game a game. The game logic is all the coding that allows the different sprites in the game to interact with each other. How close does the player need to be to that coin in order to collect it? What happens when the player collects the coin? Does a score go up? Does something else happen?
What about that enemy? What happens when he touches your player? Does the player’s score drop? Or does the game simply end?
These are the logical thinking and problem-solving skills that are a foundation in learning to code.
Step 6 – Test your Scratch game and play with friends!
Now comes the fun part! Once all the pieces have been coded, it’s time to give your game a test. Hit the flag and have some fun, but also try to keep a few questions in mind.
Does the game play the way you want? Are all the pieces working together properly? Try your best to get all the different pieces to interact in every way they can. Be sure to run your code in individual code blocks to test their functionality and identify any bugs.
Once everything is working according to plan, give yourself a pat on the back. You just made a game!
You can check out the full Dino Egg Hunt maze game that we created and remix it or create your own.
Remember that a game doesn’t have to be absolutely perfect for it to be fun. Often there will be things that you feel are missing from the game or that you might want to add later to make the game better. That’s great! Those things should absolutely be added to the game when you are ready, but in the meantime go ahead and share your game with your friends.
And have fun. You’ve earned it!
Scratch Game Tutorials
Try making your own Scratch game using a step-by-step tutorial.
Download Free Printable Scratch Coding Tutorials PDF
Get the Rocketship Landing game and Flying Space Cat Scratch tutorials in a printable format.
Make Scratch Games with CodeWizardsHQ
One of the nice things about the Scratch platform is that no one codes alone. You can easily open up other people’s projects and see how they created a game or app, so that you can do the same! Or, if you prefer, there are plenty of tutorials online that can walk you through how to make different games.
If you’re interested in diving deeper, be sure to check out our top-rated Scratch coding classes. Kids, ages 8-10, learn fundamental coding concepts in Scratch before graduating to text-based coding in Python. They’ll gain critical thinking and problem-solving skills through fun and engaging hands-on projects. Enroll today to try CodeWizarsHQ risk-free.
And, there you have it. By breaking down the game creation process into these six smaller steps, making your own Scratch game is within reach!